
Cursor 101: The Vibe Coding Playbook.
Install, master, and ship: Cursor setup, Agent Mode, and MDC rules to code faster with fewer hallucinations in 2025

Introduction to Vibe Coding:
What is Vibe Coding?
Vibe coding represents a paradigm shift in software development, where developers leverage AI tools to express high-level ideas and intentions rather than writing every line of code manually. The term “vibe” refers to communicating the essence or feeling of what you want to create, allowing AI to handle the implementation details.
Unlike traditional coding where you meticulously craft each function and variable, vibe coding involves:
Describing what you want to build in natural language, for example in English or your native language, and the AI tool will develop the functions that you described
Setting the overall direction and requirements
Letting AI tools generate the foundational code
Refining and customizing the output to meet your specific needs
Why It Matters
Speed & Focus: Automate repetitive tasks (boilerplate, tests, refactoring hints) so you can concentrate on architecture and creativity.
Learning & Onboarding: Junior engineers see immediate examples and best practices, shortening ramp‑up time.
Consistency & Quality: AI enforces style guides, lint rules, and can surface security or performance concerns as you code.
Vibe Coding in Action
Prompt: “Create a React form for user sign‑up with validation.”
AI Suggests: Component scaffold, state management hooks, basic styling.
You Refine: Tweak UX, add custom error messages, integrate with your API.
The Vibe Coding Mindset
Successful vibe coding requires a different approach to problem-solving. You need to switch from the mindset of a developer that write codes, to a software architect or the lead of an orchestra, that manages ai to do the job:
Think in Systems: Focus on describing the components and their relationships rather than individual lines of code. The AI now have a good context management, it is good to manage the code quality, but with the hulucination level is up, which can break the software, the idea is the prompt and give it as much details as possible. Two advices: Learn Prompt Engineering, and most importanly, Don’t Be Lazy
Embrace Iteration: Treat AI-generated code as a starting point, not a final product. Check each change, run tests at each iteration, and when it works, commit the changes, we never know when the AI break things. My advice here: use a test approach iteration for you.
Develop Clear Communication: The better you can articulate what you want, the better results you’ll get. Give as much context as you want as possible
Maintain Critical Thinking: Always review and understand the generated code — responsibility for the final product remains with you. Yes, you can move faster with AI, but also, it changes your job from Software engineer to Debug engineer. you need to know the basic of the things that you are doing. Learn that before blindly trusting AI
The Future of Development
Vibe coding isn’t replacing traditional programming skills; it’s augmenting them. The most successful developers will be those who can seamlessly blend traditional coding expertise with the ability to effectively direct and collaborate with AI tools.
As we progress through 2025, expect vibe coding to become increasingly mainstream in professional development environments. Companies that embrace these workflows gain significant competitive advantages in speed to market and innovation capacity. Developers who use AI, are in high demand compared to those who doesn’t.
Summary of Vibe Coding practices:
Learn Prompt Engineering
Don’t be lazy,
use Test approach, and save what it works.
Don’t be lazy, and check all the changes that an AI make.
Give as much context of what the AI need to do.
Check every change that an AI make.
Don’t rely 100% or not even 70% on AI. Learn what the AI is doing before it makes it, so you can Debug and Fix easily.
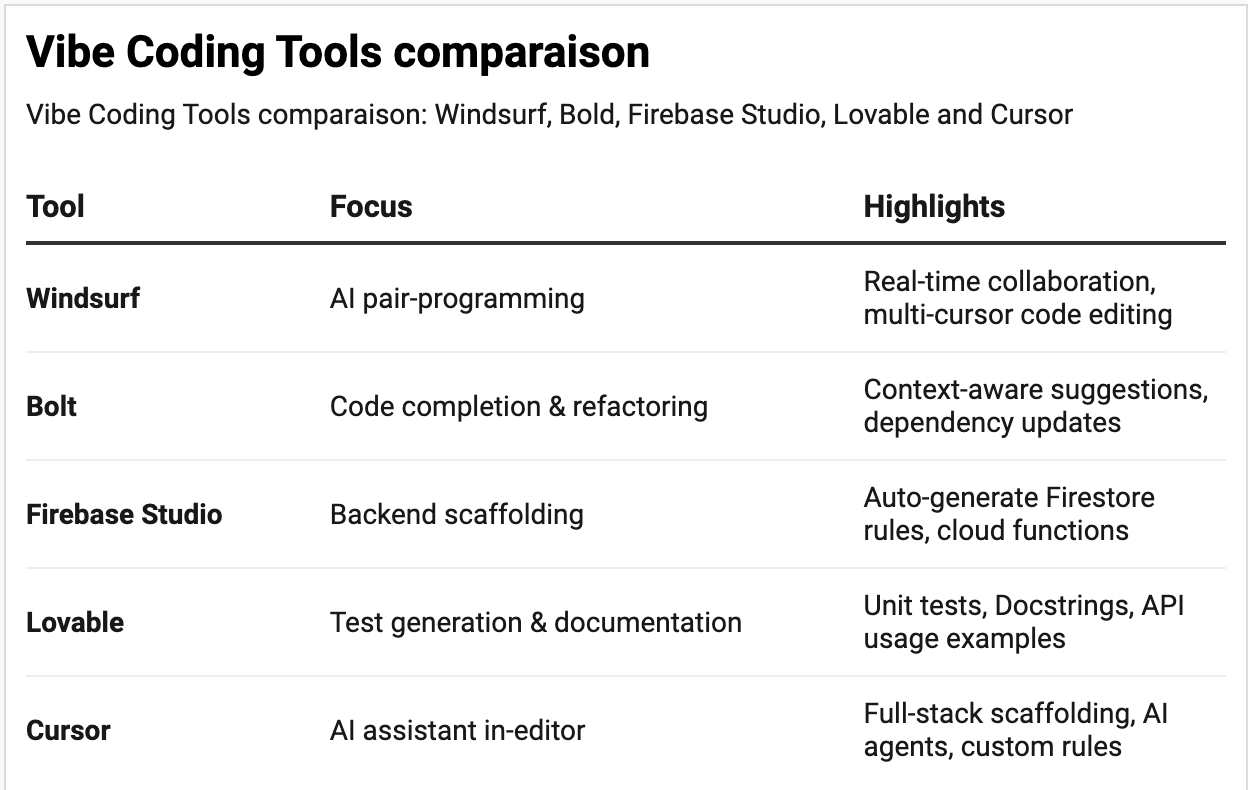
Tools for Effective Vibe Coding
The vibe coding ecosystem has expanded rapidly, with several powerful tools emerging as leaders in the space. Let’s explore the top platforms that are transforming how developers work:
Cursor
Overview: Cursor has established itself as the premier AI-powered code editor, built on top of VSCode. It excels at understanding context across your entire codebase and generating highly relevant code.
Key Features:
Chat interface that understands your project structure
Code generation, completion, and refactoring capabilities
Built-in pair programming with AI agents
Custom rules to shape AI behavior to your coding style
Best For: Full-stack development, complex projects with extensive codebases, and teams looking for consistent AI assistance that understands project context.
Windsurf
Overview: Windsurf takes a browser-based approach to AI coding, focusing on rapid prototyping and visualization.
Key Features:
Real-time preview of web applications as you describe them
Strong emphasis on UI/UX generation
Integration with design systems and component libraries
Collaborative features for team ideation
Best For: Frontend developers, design-to-code workflows, and rapid prototyping sessions.
Bolt
Overview: Bolt differentiates itself with specialized AI models trained on specific programming languages and frameworks, offering deeper domain knowledge.
Key Features:
Language-specific AI assistants with specialized knowledge
Advanced code transformation capabilities
Performance optimization suggestions
Framework migration assistance
Best For: Performance-critical applications, specialized development (embedded systems, high-performance computing), and framework migrations.
Firebase Studio
Overview: Google’s Firebase Studio combines backend-as-a-service with AI assistance, making it particularly powerful for cloud application development.
Key Features:
Natural language generation of database rules and cloud functions
AI-assisted data modeling and security rule creation
Integration with Google Cloud services
Automated API endpoint generation
Best For: Mobile app backends, serverless architectures, and projects heavily leveraging Google Cloud.
Lovable
Overview: Lovable focuses on the human-AI collaboration aspect, with features designed to make the interaction more intuitive and, well, lovable.
Key Features:
Conversation-driven development approach
Emphasis on explaining generated code and decisions
Learning user preferences over time
Built-in teaching tools for less experienced developers
Best For: Educational settings, teams with mixed experience levels, and developers who prefer a more conversational approach.
Choosing the Right Tool
When selecting your vibe coding environment, consider:
Your primary development focus (frontend, backend, full-stack)
Project complexity and scale
Team size and experience levels
Integration needs with existing workflows
Learning curve and personal preference
Many developers find value in using multiple tools — perhaps Cursor for main development work, Windsurf for UI prototyping, and Firebase Studio for backend services. The ecosystem continues to evolve rapidly, with each tool constantly adding features and improving its AI capabilities.
This is a summary of a comparison between AI tools:
Getting Started with Cursor
Cursor has emerged as a leading tool for vibe coding, offering powerful AI assistance while maintaining the familiar VSCode interface developers already know.
Why Cursor Stands Out
What makes Cursor particularly valuable for developers:
Understanding Context: Unlike many AI tools, Cursor understands your entire project structure and relationships between files.
Code-First Design: Built by developers for developers, it integrates seamlessly into existing workflows. I love the podcast of their Cofounding team with Lex Fridman < link here:
>. They such a small team of young individual, Tech nerds that love programming, and they are the ones changing and improving it, but keeping the best things that devs love, in the same time allowing collaboration between AI and devs in an easy and clear way.
Extensibility: Works with most VSCode extensions, allowing you to maintain your preferred development environment.
Learning Curve: If you’re familiar with VSCode, you’ll be productive with Cursor almost immediately.
Performance: Optimized for working with large codebases without slowing down your development experience.
Why I prefer Cursor as a tech person:
For me, Other tools are made for non-tech people to launch an MVP, create a proof of concept, or a small prototype. But always when it comes to:
“ scaling that, add a scalability layer, best practices, security fixes, and do all the clean code practices and be able to optimize the workflow in terms of tech collaboration and security fixes.”
Cursor is the best.
It is the IDE for tech people to use and add their fixes. Windsurf comes to the second place, and other tools are emerging < Claude Code, Gemini CLI,..>, but for now, as we as developers are used to VS Code and its environment, nothing beats Cursor.
As many non tech are able to validate their ideas faster, create more products and get users. They need at some point a tech person, that Tech Person will be 10x engineer, using AI tools to deliver faster new features, and add the best practices that DOESN’t break the current app, which AI is lagging right now < and It will stay that way, as no one will trust 100% AI>.
Here’s how to get started and make the most of this powerful tool.
Installation and Setup
Download: Visit cursor.sh and download the appropriate version for your operating system.
Installation: Follow the standard installation process. Cursor will automatically detect existing VSCode settings and extensions.
Authentication: The first time you open Cursor, you’ll need to create an account or log in. This helps track your usage and personalize the AI assistance.
Project Setup: Open an existing project or create a new one. Cursor works best when it can understand the full context of your codebase.
It is an easy and straightforward process for tech and non tech people.
PS: If you are a student, you can get a full year of their PRO version for free, use that.
I highly recommend to start with Pro version, as you need more tokens to implement things easily, and i see a huge limitation in their Free version. 20 dollars per month, comparring to the time that you save, it is totally worth it.
Understanding Cursor’s Mode and features:
I will explain the basic modes of Cursor, with the new Version, they create new features each time as for example the Background work, or the Github integration. I will start by talking about the basic here, and i will explain the other modes later in the process.
We have, for now two modes: Normal and Context Mode
Normal Mode
In normal mode, Cursor functions primarily as a reactive assistant:
It responds to direct questions and requests
You maintain full control over when and how AI is engaged
Perfect for targeted assistance and learning as you go
Auto Completion:
As any IDE that uses AI, Cursor enable you to auto complete your syntax or what you want to build. Just start typing and it will finish the sentence for you
2. Comment to Auto Complete:
Open a new file or an existing code.
In the editor, type:
<!-- cursor: <the command> -->for example
<!-- cursor: generate a simple Login screen, that has a text input for email
and other for password, the password need to be hidden, and add a button to validate
the login process. Add a simple function to validate that that i will implement
that later-->
3. Press Ctrl+Enter (or ⌘+Enter).
4. Cursor inserts a complete endpoint — just review and hit Save.
3. AI Chat Panel
The AI chat panel is your primary interface for vibe coding. Access it by:
Pressing
Cmd+K(Mac) orCtrl+K(Windows/Linux)Clicking the chat icon in the sidebar
This isn’t just any chat interface — it’s context-aware of your entire project and current file, allowing you to ask questions and request changes with natural language. You can add files that you want to inspire from, or any other files for the context. and add your command.
I usually use this mode for simple functions, or just a small things that i want to add. usually it does not take rules into account < i will explain the rules later in the chapter>, or any best practices.
Also, you can add a link to an official documentation or anything you want the generate code to be taking into account.
4. Code Explanation
Struggling to understand existing code? Cursor can help:
Select the code you want explained
Right-click and select “Explain Code” or press
Cmd+Shift+EGet a detailed explanation of what the code does and how it works
Agent Mode
Agent mode transforms Cursor into a proactive pair programmer:
Activate by clicking the “Agent” button in the status bar
The AI actively watches what you’re doing and offers suggestions
It can identify potential bugs, suggest optimizations, and provide contextualized help
Especially useful when exploring unfamiliar codebases or frameworks
Inline Code Generation
Cursor can generate code directly in your editor:
Type comments describing what you want to implement
Press
Cmd+L(Mac) orCtrl+L(Windows/Linux)The cursor will generate the appropriate code below your comment
This is perfect for quickly implementing functions, components, or algorithms based on your description.
This is the best part that I love about Cursor: The agent Mode. You can do anything here: from creating a huge feature by itself, to adding two lines of code that will break the whole app, and it will take you 3 days to debug that change. You need to be carefull in this mode, as it ais a nuclear weapon in your hands, but the same time you are the owner to it, and the enemy.
In my experience, I had both scenarios, and in between. The idea is to be carefull of what The AI suggest. I will talk more about how to use the rules so it doesn’t break anything. but for the moment: this is what i can advice:
Best practices in Inline mode:
Give the full context of what you are trying to do. Be as detailed as possible so it doesn’t break things
Give an example from anything: Official documentation, code snippets in your code base, articles on Medium, write something, anything can help
If you don’t understand any change that he did, don’t proceed until you understand it, ask it to explain things as it is faster that googling it: use my prompt: “Explain in a basic and esy way this change that you made, what is the context for it, and why it is important. Go into details by providing me the official documentation for that, and links to some tutorials that help me grasp it”. This way you can learn new things faster, and be able to understand the changes
Best advice is the following : Don’t be lazy. give details, understand the changes before accepting, learn about any change, and do the tests after the changes so nothing breaks.
Refactoring and Transformations
Need to refactor or transform existing code? Just tell Cursor what you want:
Select the code to transform
Open the chat panel and describe the changes (e.g., “Convert this to TypeScript” or “Refactor to use async/await”)
Apply the suggested changes
By using the agent mode, it will understand the full context of the file or what you want to do. The indexing is good at Agent mode, but provide as much context as possible; it can be the following:
Official website to know what to do
Code snippets from the code base, or add them yourself.
You can add more explanation about what you want to achieve
One of the things when it comes to refractor is to do a small example, or provide a real example so the model will understand the job, and have a full context.
Usually i ask it first to do an analayse before it proceed to the implementation, and give me a step by step how they are going to achive the goal at first, after i read that, i update the things where i think the AI didn’t understand and improve on that, before proceed to the Implementation.
Practical First Project
To get comfortable with Cursor, try building a simple project:
Create a new React component that displays a user profile
Use the chat to ask how to add state management
Have Cursor generate test cases for your component
Ask for help optimizing performance
This exercise will help you experience the full range of assistance Cursor can provide throughout the development lifecycle.
Mastering Cursor’s Rules: How to minimize AI hallucination
Now that you’re familiar with the basics of Cursor, let’s dive deeper into its advanced capabilities and learn how to leverage them for maximum productivity.
Understanding Cursor’s AI Models
Cursor offers different AI models with varying capabilities:
Fast Model: Optimized for speed, perfect for quick completions and simple questions.
Use for: Code completion, simple explanations, minor refactoring
Balanced Model: The default option that balances speed and capability.
Use for: Most day-to-day coding tasks, general explanations, and code generation
Advanced Model: The most capable but slower model.
Use for: Complex architectural discussions, sophisticated refactoring, and debugging tricky issues
You can switch between models using the dropdown in the chat interface. For most tasks, the Balanced model provides the optimal experience, but don’t hesitate to switch when needed.
Introduction to rules:
Let’s say you have a project that you have already defined the best practices, how to write code, how to write and optimize things. Whenever you use the agents mode, sometimes it indexes the code base to keep the best practices, and other times it will freestyle it. I would say it is 50- 50 when working with AI

We don’t like freestyling it; we want a consistent codebase: a uniform and coherent coding style, naming conventions, and formatting practices throughout development. We want to ensure that code remains readable and understandable, promoting collaboration and ease of maintenance among multiple developers working on a project.
To force Cursor to adhere to consistency, there is the notion of rules: Rules allow you to customize how the AI behaves and generates code, ensuring consistency with your project standards and personal preferences. They are the directives that guide the AI’s behavior when generating or modifying code. Think of them as persistent instructions that shape every interaction, eliminating the need to repeat the same guidance in every prompt.
Rules are stored in a .rules file in your project root, making them shareable across your team and ensuring consistent AI assistance for everyone.
Refer to the official cursor rules documentation here: https://docs.cursor.com/context/rules.
Creating Your First Rules File
To get started with Cursor rules:
You have two options
Using the cursor interface:
Create rules using the New Cursor Rule command or by going to Cursor Settings > Rules. This creates a new rule file in .cursor/rules. From settings, you can see all rules and their status
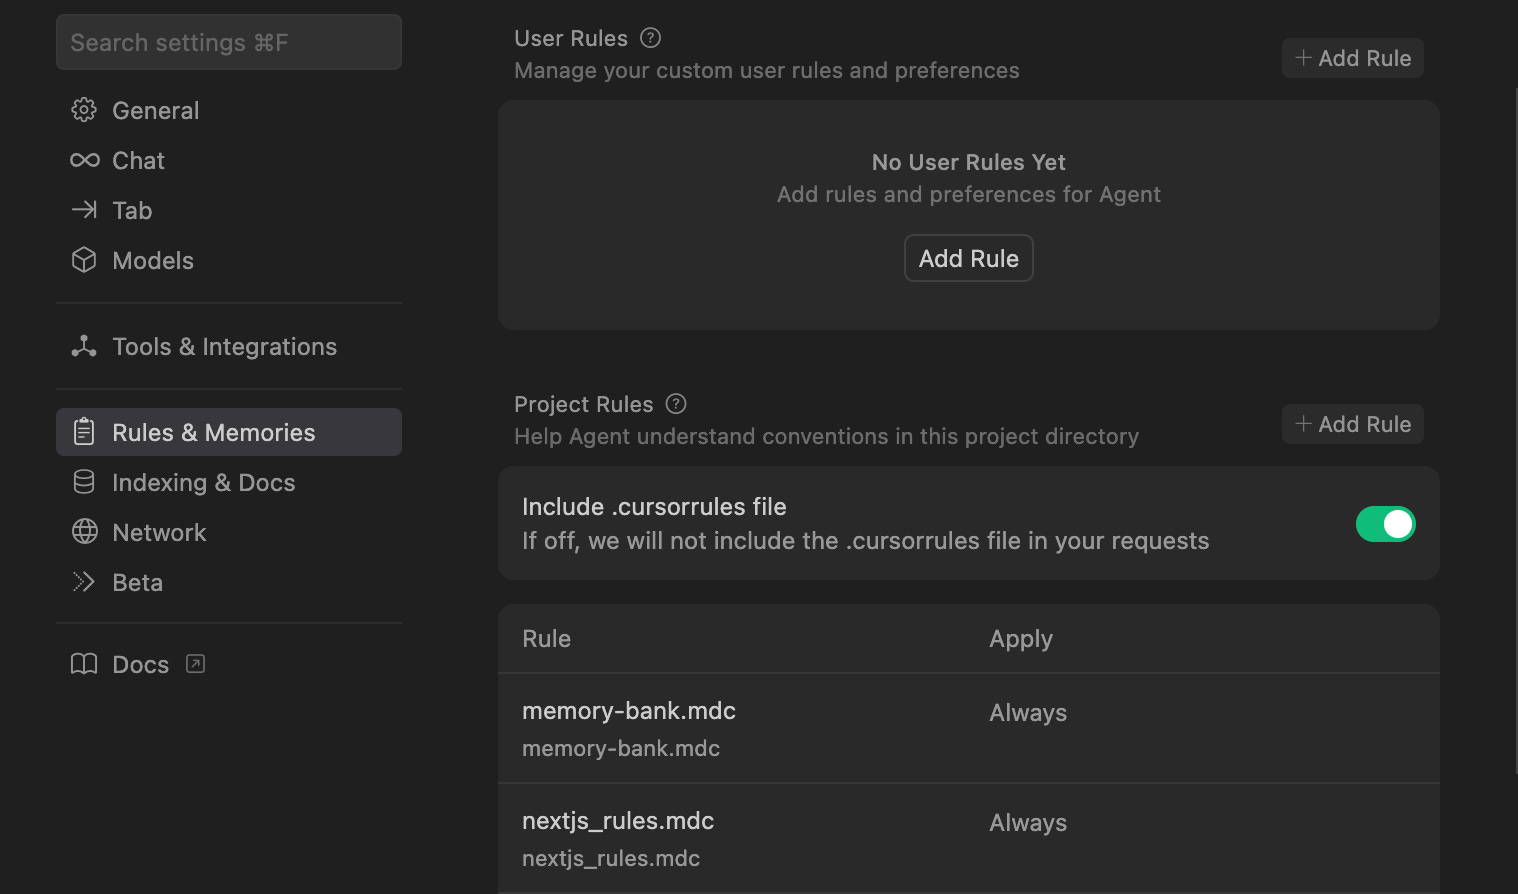
Add them manually:
Create a file named
.cursorin your project root directory and then a folder namedrulesAdd your rules using natural language instructions
Save the file with extension
.mdc, and Cursor will automatically apply these rules. if not, add the following on the top of file to enable the type of rules
Rules of anatomy:
Each rule file is written in MDC (.mdc), a format supporting metadata and content. Control how rules are applied from the type dropdown which changes properties description, globs, alwaysApply.
it has the following types:
AlwaysAlways included in model context
Auto AttachedIncluded when files matching a glob pattern are referenced
Agent RequestedAvailable to AI, which decides whether to include it. Must provide a description
ManualOnly included when explicitly mentioned using @ruleName
An example of rules, this is a simple one for the inclusion of typescript.
---
description: Typescript inclusion
globs:
alwaysApply: always
---
- Use Typescript to generate code.
- avoid the usage of 'any' for any type.
A basic .rules file might look like this:
# Project Coding Standards
- Use TypeScript for all new files
- Follow the Airbnb style guide for JavaScript/TypeScript
- Use functional components for React
- Add JSDoc comments to all functions
- Use camelCase for variables and functions
- Use PascalCase for component names and classes
Types of Rules You Can Add
1. Code Style Rules
These rules enforce consistent formatting and style:
- Always use semicolons at the end of statements
- Use double quotes for strings
- Maximum line length should be 80 characters
- Use 2 spaces for indentation
- Prefer arrow functions over function declarations
- Always use explicit return types in TypeScript
2. Architectural Rules
Guide the AI on how to structure your application:
-Follow Model-View-Controller pattern
- Place API calls in dedicated service files
- Store constants in a separate constants.ts file
- Use Redux for global state management
- Implement error handling with try/catch blocks
- Use environment variables for configuration
3. Documentation Rules
Ensure consistent documentation across your project:
- Add a header comment to each file explaining its purpose
- Document all public functions with parameters and return types
- Include examples for complex functions
- Add TODO comments for incomplete implementations
- Comment on any non-obvious code behavior
4. Testing Rules
Guide on how tests should be implemented:
- Write unit tests for all utility functions
- Use Jest for testing
- Follow Arrange-Act-Assert pattern in tests
- Mock external dependencies in tests
- Aim for at least 80% test coverage
5. Project-Specific Rules
These are unique to your project’s domain:
- User authentication must use JWT tokens
- Follow HIPAA compliance guidelines for patient data
- Format currency values with 2 decimal places
- Use ISO 8601 format for all dates
- Implement progressive loading for image assets
Advanced Rule Techniques
Context-Aware Rules
You can create rules that apply only in specific contexts:
# In React components:
- Use React.memo for components that render frequently
- Keep components under 200 lines of code
- Separate business logic from presentation.
- use useCallback hook for any function for better performance, and
  keep track of the dependency array
- don't pass any object to the useEffect, if it is necessary,
  memorise it before passing.
- use the best practices from official documentation in https://react.dev
Negative Rules
Sometimes it’s valuable to explicitly state what NOT to do:
- Don't use any with TypeScript
- Avoid using setTimeout without cleanup
- Never store sensitive information in localStorage
- Don't use inline styles in React components
- Avoid default exports
6. Code snippets as an example
You can define the rule and feed the AI with an example:
- Document public APIs and use proper JSDoc.
- Document complex logic and keep docs updated.
**Example:**
```typescript
/**
 * Handles user authentication
 * @param {Credentials} credentials - User credentials
 * @returns {Promise<User>} Authenticated user data
 * @throws {AuthError} When authentication fails
 */
async function authenticate(credentials: Credentials): Promise<User> {
  // Implementation
}
Awesome Rules Examples
Here are some powerful rule configurations for different project types:
For a React/TypeScript Project
# React/TypeScript Project Standards
## Architecture
- Use feature-based folder structure

- Create custom hooks for reusable logic
- Use Context API for component-level state
- Keep components pure when possible
## Code Quality
- Prefer explicit types over 'any'
- Use interfaces for object shapes
- Add prop validation with PropTypes
- Extract complex logic to separate utility functions
- Keep components under 150 lines
## Performance
- Memoize expensive calculations with useMemo
- Use React.memo for pure components
- Implement virtualization for long lists
- Lazy load routes and heavy components
## Accessibility
- Add proper ARIA attributes to interactive elements
- Ensure color contrast meets WCAG standards
- Make all forms keyboard navigable
- Include alt text for all images
Integrating Rules into Your Workflow
To make the most of Cursor rules:
1. Let AI do the draft: There is a feature in Cursor when you click on / , It shows the command: “generate cursor rules’
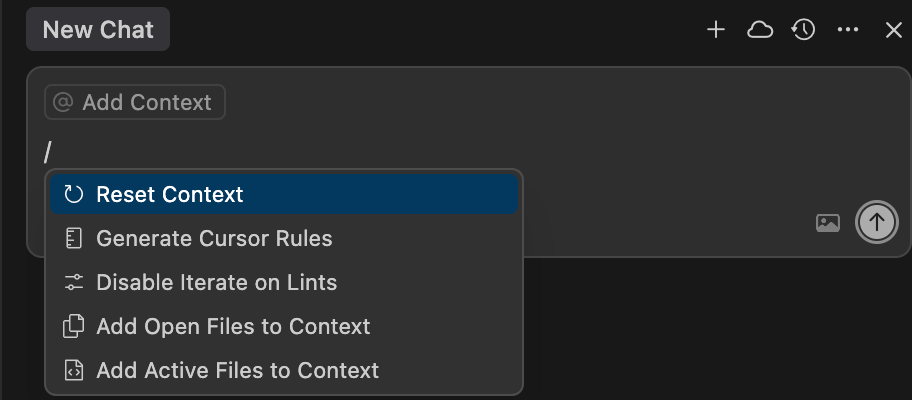
Let the AI generate the first draft of the rules for you. Check each one of them, and add/ modify or delete what you find relevant. Here, you need to be careful, as each line can take AI into a whole new direction.
2. Start Small: Begin with a few critical rules and expand gradually.
3. Review and Refine: Periodically review your rules to ensure they remain relevant.
Usually, after a code that is generated by the AI that I don’t like, or it doesn’t make any sense why it went that direction. I prompt the following:
“Explain to me step by step your thought process, and how you decided on the previous approach. Don’t forget to add any details of where did you come up with the approach, the architectural and conceptual decisions”
This way, you can reverse engineer the AI agent work, and you can either improve your Prompt engineering skills by adding more context and details to your prompt or your rules.
Team Alignment: Discuss rules with your team to ensure everyone understands and agrees with them
.You can share experience, this is the best way to learn how to keep the rules file fresh.
Rules as Documentation: Use your rules file as living documentation of your project’s standards.
Rules Directories:
If you want to have pre-defined rules, that you can see and start implementing, look at these two websites that I usually use:
check this Github repository: https://github.com/PatrickJS/awesome-cursorrules
https://cursor.directory/
: you can find different rules that you can use. just search your stack there
Remember that Cursor is a tool to augment your abilities, not replace them. The most effective developers maintain critical thinking and review all AI-generated code before implementing it.